Friday, October 21, 2011

Candy Corn Fun

I like following the Kitchen Magpie's blog to see what all she is cooking up each week. The other day I saw her photo for this recipe and I wanted to try it without actually reading the recipe. I like to figure things out for myself, so I picked up some ingredients at the store and tried mixing this together while some of our friends were heading over to hang out. I was so embarrassed with the final product  because things went awry. The butterscotch got clumpy really quickly, and we ended up with a strange bar of butterscotch-candycorn-stuff. I was disappointed because aside from figuring things out on my own, I also like to get things right...the first time. 


I knew it was my fault for heating the butterscotch too quickly, so this week I picked up the supplies again, determined to get it right.  Here is how it turned out:


Candy Corn Haystacks


 Ingredients
1 bag of butterscotch morsels
2/3 cup of chow mien noodles
1/2 cup of peanuts
1/2 cup of candy corn

Directions:
1) Place the butterscotch morsels in a glass bowl and microwave them at 15 to 30 sec increments
2) Stir after each heating spell
3) Keep stirring even if all of the morsels have not melted because once some of them start to melt, eventually all of them will


The butterscotch should look creamy like this
 3) Once the butterscotch is smooth, add in the other ingredients.
all of the ingredients in the bowl
4) Stir them all up together so that the butterscotch covers all of the ingredients


5) Using two spoons, scoop out chunks of the mixture onto wax paper


6) Then stick two candy corns on the top to make them look pretty 
7) Let them cool for about 15 minutes and then serve them up! 


Do you have any other cool ideas for candy corn?


Thursday, October 20, 2011

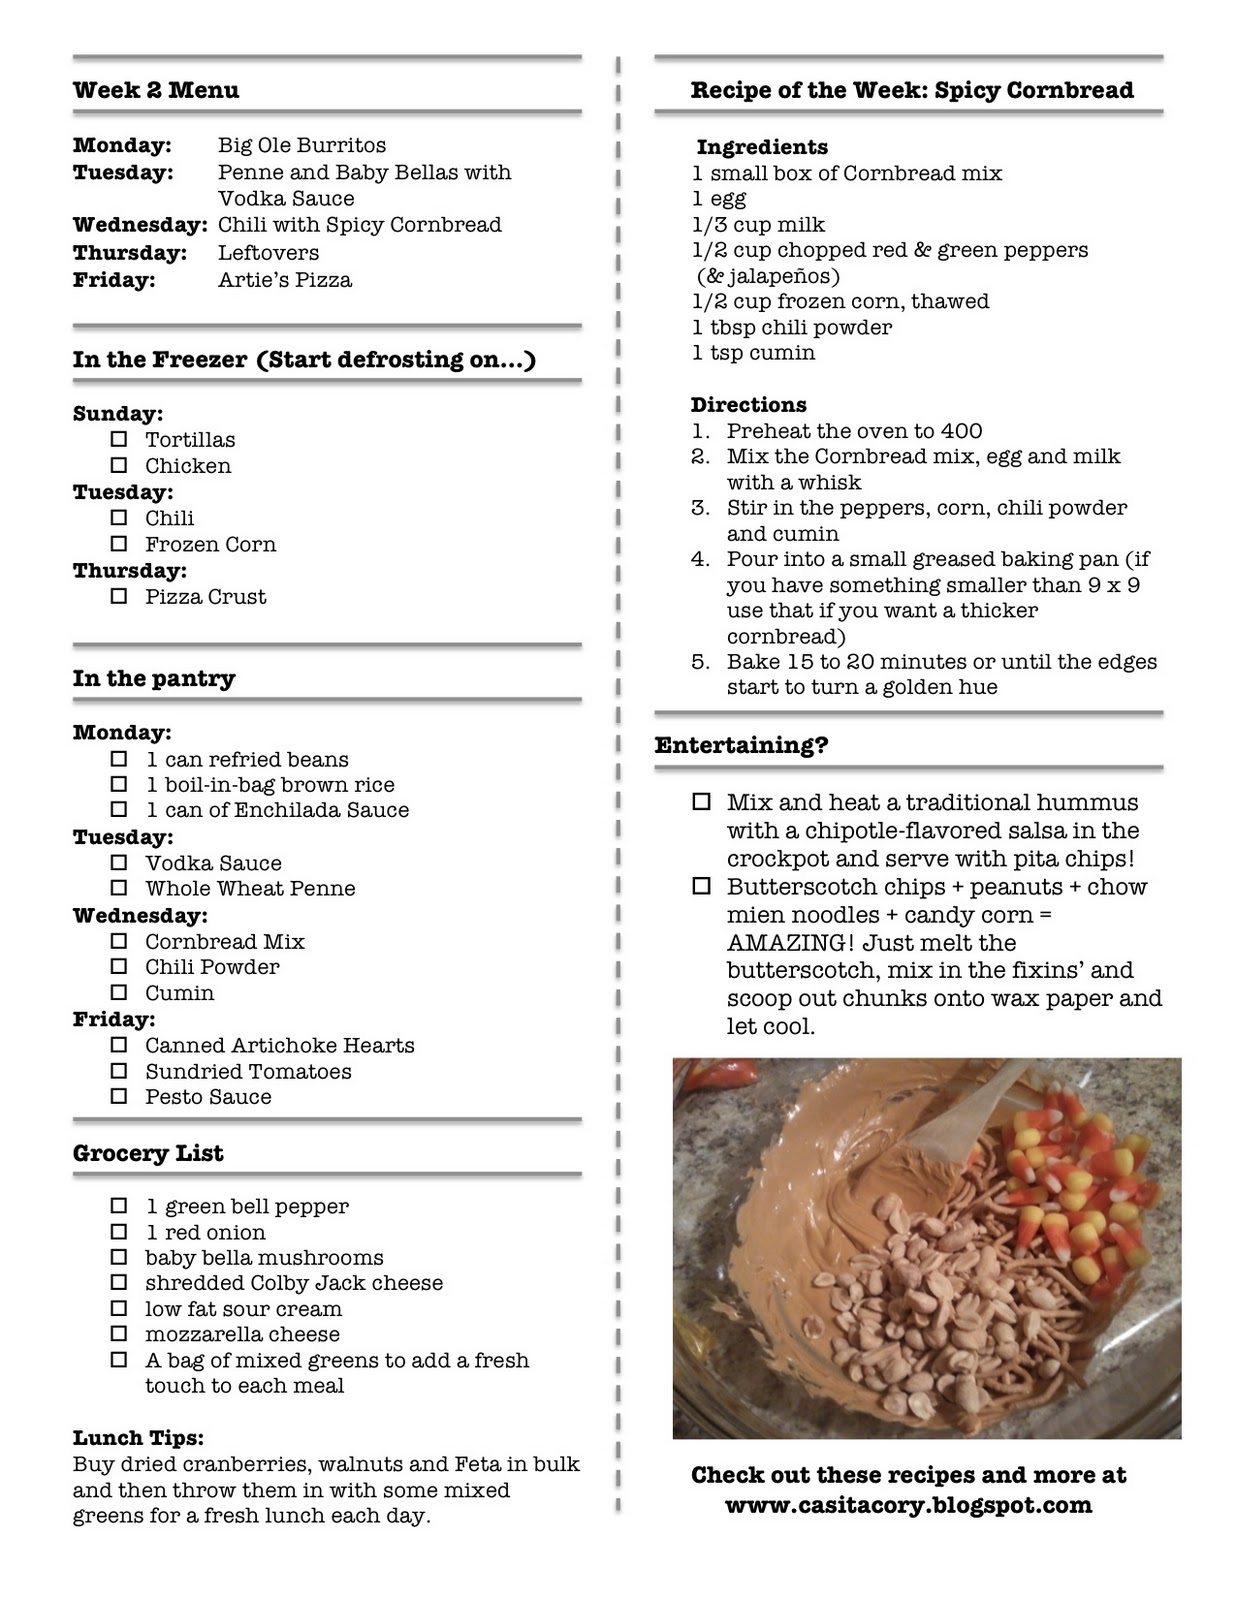
9 Week Menu Update & Printables


I have been wanting to post this all week, so here it is! 


This 9 week menu plan is the best idea I have ever had. The stress I have been feeling about cooking and grocery shopping is completely lifted. Last week all of the meals were delicious and took no more than 20 minutes to prepare. I posted pictures last week of the Fajitas and Pesto Tortellini with Sun-dried Tomatoes which you can check out here along with the Week 2 menu, grocery list and recipe card. The week rounded out wonderfully with the BBQ chicken serving as dinner Friday and lunch on Saturday. I made a pasta casserole for dinner Saturday which took us through lunch and 1/2 a dinner on Sunday (we only had one portion left at dinner...guess who got it--hint*itwasntme*). 


On Monday we actually decided last minute to celebrate our anniversary out. I was kind of relieved because as much as I love my Big Ole Burrito recipe, nothing about refried beans sounds romantic on your anniversary.


Tuesday night the Penne with Vodka Sauce and Baby Bellas took approximately 15 minutes to throw together (once the water came to a boil), and on Wednesday the chili and spicy cornbread totally rocked my socks. 


Vegetarian Chili with Spicy Cornbread
I froze half of the cornbread after baking it for the next chili week


Here are my favorite things about the planned ahead meals:
1) I no longer waste time during my day worrying about how to get everything done
2) I have had time each night to work on my grad school work for about an hour or more
3) I don't have to eat the same meal two nights in a row
4) I look forward to picking what I get to eat for Leftover Thursdays
5) I have more time to bake and think about what to bake
6) I have more time to blog


Here is the grocery list and menu for week 2...I'm sorry I am just posting it, but I will have week 3 posted Saturday morning! I changed the format on it just a bit, so let me know what you think. 
Click to enlarge, download and print!


Have any of you tried any of the ideas in the 9 Week Menu yet? Are they working for you? Leave me a comment and let me know!


Butternut Squash & Sweet Potato Bisque

On a recent trip to the North Carolina State Farmers Market (a place you must visit if you are ever in town for a few days!), I picked up sweet potatoes to have with veggie soup and a small butternut squash to make one of my favorite fall flat breads. We ate sweet potatoes for three nights in a row, and after the last night even the butter and brown sugar were failing to keep our taste buds interested.

This was the week of my crazy cooking extravaganza to get ready for my 9 week menu plan, so I had so much food around the house that I never ended up buying the ingredients to make the flat bread. I needed to figure out something to do with these two ingredients so they didn't go to waste.

I love soups in the fall, and thought that maybe I could put those sweet potatoes into some sort of bisque. I found a recipe for Sweet Potato Bisque online, which helped me decide what spices to add. I wasn't sure what flavor profile to go for with this, and her recipe caught my attention because I love the combination of chili powder and cinnamon. Here is what I used...(I forgot to measure the spices. I just kind of threw them in and it worked out fine!)


Ingredients:
1 yellow onion, sliced thin
2 cloves garlic, diced
1 tbsp chili powder
1 tbsp coriander
1/2 tbsp cumin
1 tbsp cinnamon
1 tsp sea salt
1/2 tsp coarse ground black pepper
1 large pre-baked sweet potato, peeled and cut into 1/2in chunks
1 small butternut squash, peeled and cut into 1/2in chunks
1 qt Chicken Stock
2 tbsp butter or olive oil
(You can also use a sweet potato that has not been cooked and add it when you add the butternut squash)


What you do now is...

1. Preheat a stock pot to medium-low and add in the butter
2. When the butter melts, add in the onions and cook until they caramelize in the butter
3. Remove a few onion slivers to serve with the soup and add the garlic


 4. Add in the salt, pepper, cumin, coriander, cinnamon and chili powder, mix with the onions and let cook for 1 to 2 minutes
5. Pour in the chicken stock and scrape up the spices off the bottom of the pan

 
6. Add the butternut squash (and fresh sweet potato)
7. Bring to a boil and then lower heat to a simmer for about 30 minutes (I added in my cooked sweet potato after about 20 minutes)


8. Remove from heat and add the soup contents to a blender and puree to a smooth texture


9. Top with the caramelized onions and serve


I served this with Rib Eye steaks and a salad of fresh greens. This made enough that Forrest and I had a bowl the next evening with dinner as well. It is the perfect dinner for the cool evenings headed our way with the coming of the fall.


Wednesday, October 19, 2011

TJ Special: Jack-o-Lantern Pumpkin Pancakes

This is the first installment of TJ Special, a segment of my blog where I will feature Trader Joe's products in a recipe. This probably won't be a weekly installment, but just something I share when it hits me just how much I love Trader Joe's!

Before Forrest and I moved to NC, we never really had weekends off together. Any weekend we did both have off together we would plan trips to visit family and friends, which often made weekends fun and exhausting all at the same time. Now that he has an 8 to 5 (ish--we all know that most jobs take much longer than our actual contract hours require) we get to hang out almost every evening, and our weekends have become such a great opportunity to spend time together. 

I store our candy corn in a Mason jar

Since we have moved, my favorite new ritual is Sweatpants Sunday. We wake up and head to service at the Summit and then come home and hang out in our sweatpants until it's time to get cleaned up for small group. I absolutely love it. Another great thing about our weekends is that we get to enjoy breakfast together, and we usually make something special. 

The past few weeks while doing my grocery shopping at Trader Joe's I have seen so many amazing pumpkin products: Pumpkin Cream Cheese Spread, Pumpkin Ice Cream, Pumpkin Bread Mix, Pumpkin Pancake Mix and Pumpkin Butter...just to name a few. In case you hadn't noticed (see Pumpkin Dump Cake and Pumpkin Angel Food Cake) I am kind of in love with pumpkin...a lot. We had chocolate chip pancakes last week, but that box of Pumpkin Pancake Mix has been calling my name.

I had some pumpkin left over from making Forrest's birthday cake this week and I decided that would be used in my recipe experiment. We had a box of Trader Joe's Multigrain Pancake Mix in the pantry, which calls for 2 eggs (140 calories) and 2 tbsp Vegetable Oil (240 calories) . I decided to replace these two ingredients with about 3/4 a cup of pumpkin which contains a total of 75 calories (less than 1/4 of the calories in those two ingredients combined). The batter turns just a little bit orange with the pumpkin, so then I got the idea of trying to make them look like Jack-o-Lanterns. I didn't make them in a mold or anything, so they are far from perfect, but I think it would be really fun to make these with kids. We definitely felt like kids eating these this morning!


Jack-o-Lantern Pancakes

Ingredients:
2 cups of Trader Joe's Multigrain Pancake Mix
3/4 cup of Trader Joe's Organic Canned Pumpkin 
1 cup Trader Joe's Original Almond Milk 
2 tbsp Trader Joe's Pumpkin Spice 
1/2 cup Trader Joe's Semisweet Chocolate Chips

(Note: you can use any pancake mix that calls for eggs and oil, your preference of milk--we drink almond and you can read why here, and any canned pumpkin--not pumpkin pie filling)

How To:
 
In a medium bowl whisk the pancake mix, almond milk, pumpkin and pumpkin spice until all of the ingredients are incorporated. 


Heat a large or medium skillet to medium-low heat, and lightly spray the pan with whatever kind of butter/oil spray you have around the house. Use a small ladle (I use my gravy ladle) to pour the batter into medium-sized circles on the skillet. Place the chocolate chips on the batter to create the eyes, nose, and crooked teeth of the Jack-o-Lantern. Cute right?


When the batter on the outer edge of the pancake starts to bubble and cook, carefully flip the pancake over and let it cook on the other side. Here is what our Jack-o-Lantern Pumpkin Pancakes looked like in the end. Like I said they weren't perfectly formed, but I think they turned out looking kind of creepy, which I think works for the Halloween season!


Without the eggs and oil these pancakes are actually a little more dense and moist, which I prefer. The hint of pumpkin is just enough that you can taste it, but it doesn't totally overpower your taste buds. Try it out and let me know how it goes!

Window to My Wednesday


the names of my make-up make me smile
gold ballet flats + floral scarf = my 2 fav accessories
6:00am quiet time
hope for a new day
I <3 Wake Forest Coffee Co.
afternoon shopping spree

and one more from last Wed...the colors got me...
classroom fun (la lápiz...can't win 'em all)

Monday, October 17, 2011

DIY Fall Wedding Ideas

Today Forrest and I celebrate 2 years of wedded bliss. Woo hoo! We kind of love October because we started dating in October of 2006, got engaged in October of 2008 and were married October 17, 2009. October just so happens to be a pretty good month for the Corys!

To celebrate our special day, today's post is focusing on some of the DIY ideas we really enjoyed putting together, and the little impact each thing had on our wedding.


I love designing graphics on my computer. I had a Mac at the time with Microsoft Word, so my graphic design capabilities were limited, but I did manage to design a few things I really enjoyed.

Our wedding programs:  I designed them and my Dad had them printed by a friend of his (who so kindly copied and folded them for FREE!)


Menus: We had a buffet with several stations, so I wanted our guests to know what options were available.


Table Decorations:  Each table was named after a city Forrest and I had traveled to while we were dating. We made table markers with pictures of Forrest and me in those cities.


Table Assignments & Favors:
While Forrest and I were dating, he played baseball all over the country. During the 6 to 8 months he was playing ball, I spent many weekends jet-setting to wherever he was to see him for a few days. I don't even know how many different flights I took during those 3 years. We wanted people to understand that aspect of our relationship somehow through our wedding. With each table named after a city, we thought it would be cool to assign people to tables by using plane tickets. I designed a template for the plane tickets and each person received one as they entered the reception with their name and table "destination." We also gave luggage tags as favors. The front said, "Thanks for being part of our special day," and the back had each guest's first and last names.


Pumpkin Dip Recipe: Then we bagged up ginger snaps, attached a recipe for Pumpkin Dip to each and set them at each place setting.


Our Pumpkin: Forrest proposed to me in a pumpkin patch, and with our special attachment to October, we wanted to have a fall wedding that highlighted some of our favorite things about the season. The color orange played a prominate role in the wedding. We had orange everywhere!!! When we first got engaged I wanted everything to be pumpkin, but I decided with so much orange it might be over the top. The one pumpkin I did commit to in the wedding was the flower arrangement my flower girl carried. My florist (who was retired and worked out of her home and saved me sooo much $$$ on my flowers...and did a fabulous job!) hallowed out a pumpkin and filled it with complimentary flowers to the bridesmaids' bouquets.


Bridesmaids Gifts: I gave each bridesmaid a dark silver clutch to bring to the wedding. To personalize them for all the girls, I found vintage pendants to put on each.


Here are some of the other things I loved about our wedding:

our cake: found that ribbon dirt cheap at The Pottery

my bouquet
the wren

husband & wife
dancing

history

never-get-old wedding songs

family & friends

dancing with daddy

 starting our life together

We are so thankful to everyone who made our day so amazing, and we thank God that He brought us together and has shown us each day how to love each other with a renewed spirit. Have a fabulous Monday!

Saturday, October 15, 2011

Pumpkin Dump Cake

On a recent visit to my parents house I was perusing their pantry for something to make for dessert. I saw a cake mix and thought it might be fun to make a dump cake. I made one with canned cherries and pineapple, and we all really enjoyed it. It was like a mixed up pineapple upside down cake. On my drive home I started thinking about how to make a version with fall flavors. I have made muffins with canned pumpkin, but I wasn't sure how to make a pumpkin dump cake. I was actually browsing on Pinterest and someone had pinned a picture from this blog which lead me to a great Pumpkin Dump Cake Recipe.

Here is the recipe, but find a printable card at www.cookiesandcups.com.

Ingredients:
1 can of evaporated milk
1 can of pumpkin
3 eggs
1 cup brown sugar
3 tbsp pumpkin spice
1 yellow cake mix
2 Heath bars, cracked up
4 graham crackers, cracked up
1 cup of melted butter

Preheat the oven to 350 degrees.
In a medium bowl mix the evaporated milk, pumpkin, brown sugar and eggs.


How is this so good?


Pour this mixture into a greased 9 x 13 baking pan

bottom layer
Next pour the box of yellow cake mix evenly over the pumpkin mixture.


Top with the Heath bar and graham cracker bits, and pour the butter over the crumbles. Bake for about 35 to 40 minutes or until the top layer starts to brown.


Enjoy with a big scoop of vanilla icing!